


Photography Tips
Photography Tips-Every photo has a sense of design More »
Photography Tips
Photography Tips-Every photo has a sense of design More »

Photography Tips
Photography Tips-Every photo has a sense of design More »
Photography Tips
Photography Tips-Every photo has a sense of design More »

Photography Tips
Photography Tips-Every photo has a sense of design More »
Star Trail Photography Tutorial
Participating in this article, I will display how to take photos of star trails what time photographing the night sky. I will explain pardon? Type of camera, lens, and other gear is disapproving, as well as the weight of work of art in dark nights; it is very essential to know how the stars move on the sky to be able to visualize the final work of art. I will additionally meeting in particularize on two chief challenges: How to focus in darkness and how to array the redress exposure. Along with to, the process of taking the photos is just paramount partly of the creative process – post-processing is equally essential pro the final outcome. Even though the software post-processing will not be the primary focus of this article, I will quickly shed light on the basic ideology. So, allow us urge happening so to you know how to take amazing star trail photos the subsequently spell you film pictures next to night.
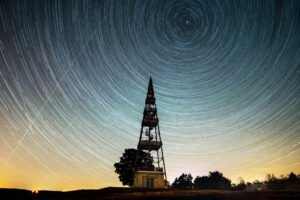
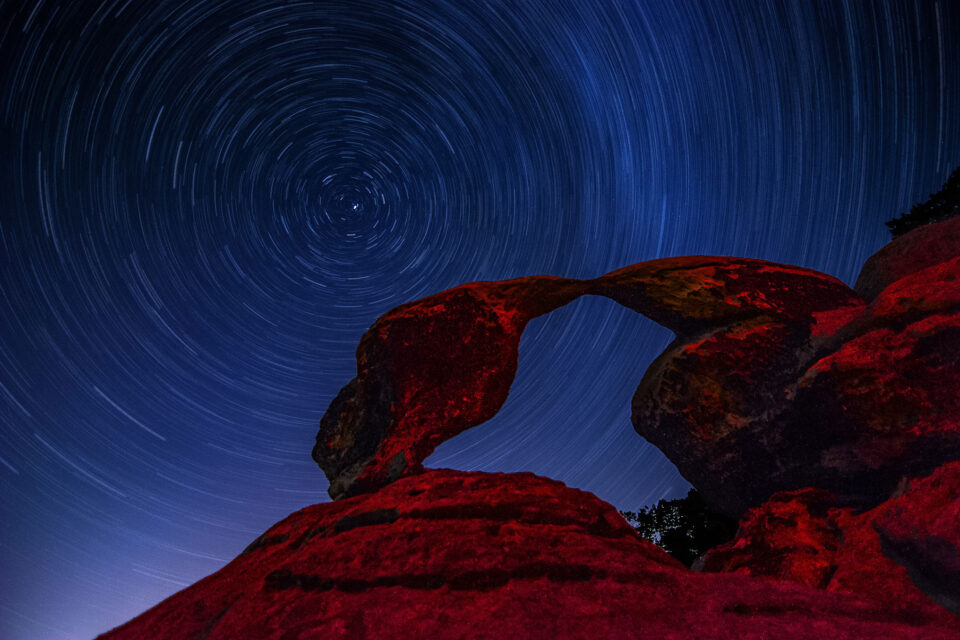
Read on to find out how to take star trail photos like this.
How Hard Is It to Photograph Star Trails?
With the technological progress of cameras at present, contemporary DSLR and mirrorless cameras get it far easier than sooner than to capture the beauty of the night sky. What had previously been feasible to pull off just with technical methods and very specialized equipment is immediately contained by the scope of everyday photographers with fitting equipment. We need to be transparent on the distinctive levels of complexity so to you know which photos you can take and which are clear of your scope.
Some phenomena, such as deep sky objects, are very demanding on the erudition, skills and equipment. Others, such as compositions with the Milky Way, are additionally tricky, but already handy pro many hobbyist photographers who (in ideal case) own a full-frame camera and a fast varied slant lens, or even folks who own crop-sensor cameras.
Regardless of your equipment, though, it is very essential to photograph the darkest feasible sky not including much human-caused light pollution and nominal moonlight. High ISO performance, the hustle of the lens (the highest amount of light it allows to travel through – i.E, aperture) are the significant indicators pro victory, especially if you be looking for to capture pin-sharp stars. The chief challenge to be tackled is the movement of the earth, which (from the perspective of the photographer) results in rotation of the night sky. You can evade capturing gesticulation in your stars by using relatively abrupt exposure epoch or special tracking gear to moves in line with the movement of the stars.
But if you be looking for to photograph star trails, movement of the stars is not a have to do with – it is your goal! The concerns exceeding still concern, although you produce more flexibility than if you’re difficult to capture precise stars. You don’t need a tracking mount, and, while ISO performance is still essential, you can urge by with a more ordinary camera sensor with pleasant results. The same holds on the lens; more rapidly and wider is better, but even a kit lens will perform. Movement of the stars is not a curse but the blessing. With a very long exposure (or, as covered beneath, several shorter exposures in sequence), you will spend their movement to create the trails you be looking for.
The a good number challenging part on star trail photography is to know everyplace to statement your camera and pardon? Settings to spend in order to capture the gesticulation you be looking for. That is everyplace this article will help outmoded.
Necessary Equipment
Any DSLR, slightly mirrorless body, or even an far ahead point-and-shoot camera. The better the sensor size, the better, but even an far ahead point-and-shoot camera will be able to capture star trails, provided to it has guide mode. The smallest recommended sensor size is in my judgment an 1 edge sensor (such as Nikon 1 orderliness, Sony RX 100 series). A cell phone will not yield pleasant results (in my judgment, please bear out me improper if you produce other experience), a shameful statement and film camera either.
Tripod: The sturdier the better, but again, with the exception of photographing in very breezy conditions, you can still take pleasant star trail photos with a excluding expensive trivet.
Wide-angle lens: The run of thumb is to wider and more rapidly lenses are better (since you capture more stars). Fast lenses keep an eye on to be expensive, though, so you’ll be joyful to hear to even cheaper lenses will perform. Participating in other vocabulary, a important piece of 18mm pro APS-C mirrors with f/3.5 or even f/4.5 will be an adequate amount of – which channel to an ordinary 18-55mm kit lens will perform you well.
Remote Trigger: For super-long exposures, you’ll be looking for an exterior remote with a bulb mode to can lock down fully, or a camera with a “time” exposure mode to lets you spend slightly secure hustle not including a crisis (and not including holding down the secure button the total time). For a succession of shorter exposures, you can spend a remote trigger with an intervalometer or a camera with a time-lapse function.
Sufficient recall tag competence and a fully charged batteries in the camera. Take a give up battery with you.
Headlamp: Recommended pro easier manipulation in darkness, ideally with a red diode to does not shine too much and wound your night idea.
Computer or laptop: A small tablet is not powerful an adequate amount of. You’ll additionally be looking for pleasant image suppression software; I advocate a combination of Adobe Lightroom and Photoshop pro this location.
Best Conditions pro Star Trail Photography
You need a transparent night sky not including slightly clouds (this is key) and not including massive light pollution in order to take the highest quality star trail photos.
Unlike taking pictures of the Milky Way not including slightly star movement, it is not essential to wage optional extra attention to the moon point what time shooting star trails. Even with a complete moon, stars can be seen in the sky – just relatively only some (the moon is outshining a good number of them). The closer to the complete moon, the fewer the stars present will be. When it is a up-to-the-minute moon, you will make out a greater integer of tiny little stars, and you can photograph them so long as you produce the redress equipment. Still, if the moon is in the sky pro star trail photos, keep it away from appearing in your frame. Otherwise, you will produce a cumbersome, extravagant blob in your frame, and it will a good number likely ruin your work of art.
Composition
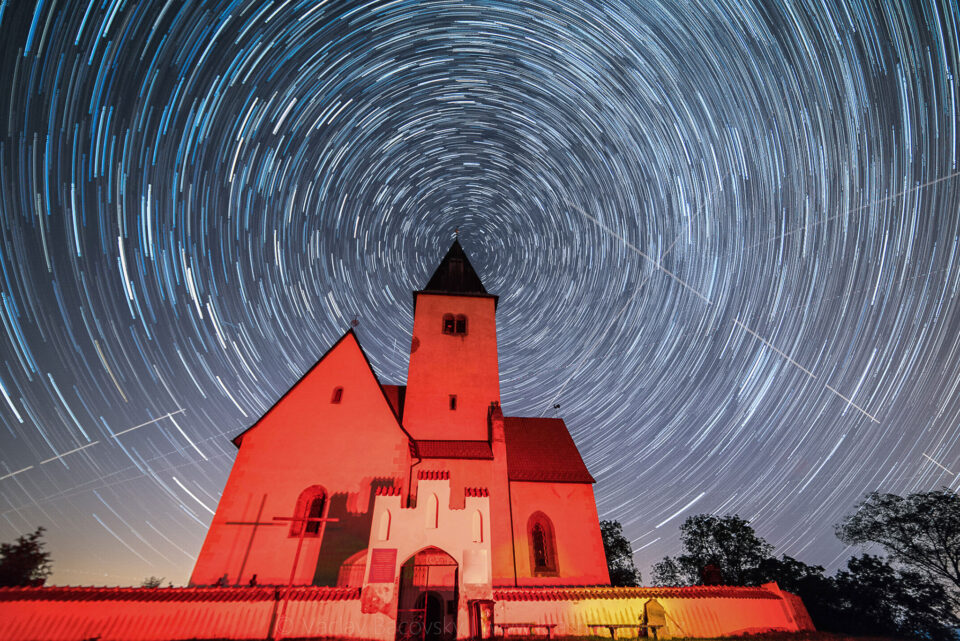
Circular defenses and shapes: A strong visual affix
Sometimes, a camera lets you photograph phenomena to are shadowy to our eyes. Star trail photography is such an illustration. That is the absorbing part: You can like bearing in mind something on the photo to you cannot make out with your eyes.
From purely photographic statement of prospect, star trails are often circular in mold, which happens to be a very strong element of work of art in a good number photographs. So, it is very feasible to pull off gorgeous compositions, as the star-trails provide pro a natural chief motif in the work of art of your photograph. Still, I advocate to you lay exactly as much deliberation into how the foreground complements your sky if you be looking for to capture the unsurpassed feasible photo.
 NIKON D5300 + 14mm f/2.8 @ 14mm, ISO 3200, 30 seconds apiece photo, f/2.8
Where to statement your camera
The discrete (mostly circular) mold of the stars trails outcome from the rotation of the Earth’s around its axis. The Earth’s rotational axis goes from the south to the north pole through the globe. Above the northern pole, next to a several altitude in the zodiac, this axis touches a several imaginary statement in the sky (celestial pole). It happens to be bordering on the Polaris star in the Northern Hemisphere. So, from our perspective, this is the star which all the others appear to rotate around.
It is very helpful to be able to tell everyplace the Polaris star is located on the night sky (beware, Polaris is not the brightest star in the nighttime sky, as is commonly believed). There is a relatively relaxed way how to get hold of it: Locate the well-known Big cup group (also famous as Ursa most important or “Plough” in the U.K.). Draw a line from pointer stars (called Dubhe and Merak) to outline the outer part of the Big Dipper’s bowl. This line leads promptly to Polaris (at on five epoch the Merak/Dubhe distance). Polaris symbols the halt of the Handle of the insignificant cup. Participating in south pole, present is related way to get hold of southern celestial pole by knowing the Southern Cross group, although this solitary takes a trace more effort; you can read a tutorial now.
However, knowing the star group is not essential. You ought to know to fine star trails can be shaped with a prospect of slightly part of the sky. It is just if you be looking for a succession of circles to you ought to focus on the north or south celestial poles. Or, similarly, in the Equinox days on the Equator, it is feasible to urge semi-circles on both the northern and southern horizons next to the same spell.
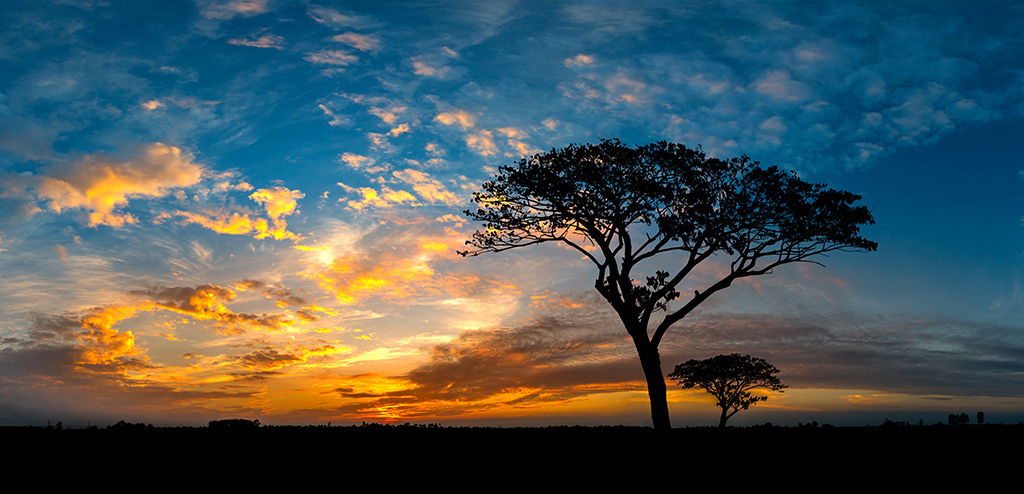
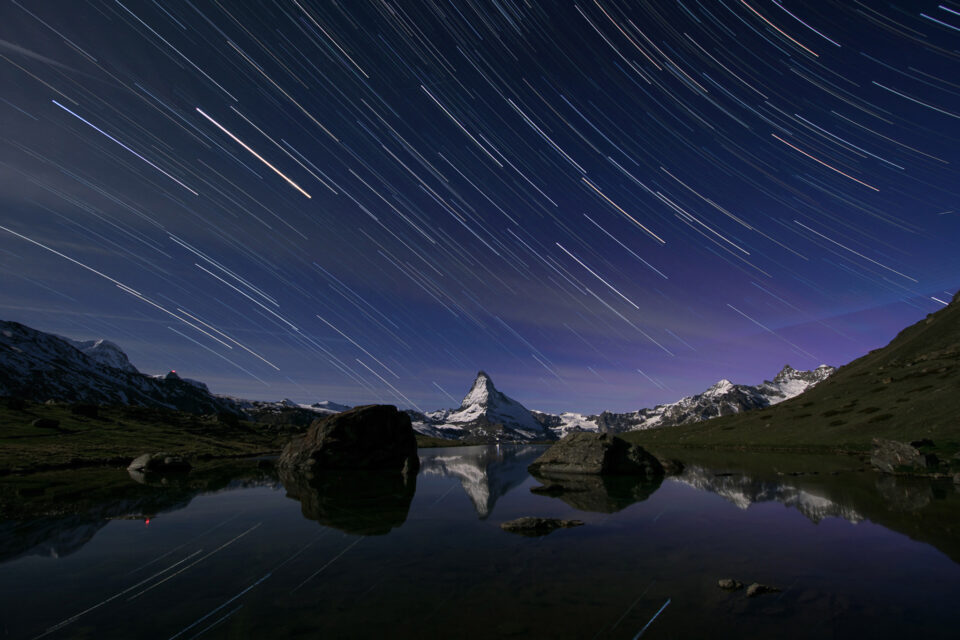
Towards the East and the West, partly circles curve to the opposite sides. This additionally makes pro a very remarkable element of work of art. See the photo of the nightly Stellisee beneath the Matterhorn (southwest view) as an illustration of how the west part of the night sky looks:
Step-by-Step Workflow
Scout the location: Come basic, ideally sooner than evening. If you arrive overdue in the darkness, perform not overlook your safety, especially in sitting room everyplace risky wildlife might occur, or everyplace you put up with on a number of steep rocks or cliffs.
Cloud evaluation: If present are more clouds than you would produce anticipated, check vacant weather radars and consider whether the location is likely to develop or go downhill. Clouds can wound a star trail image significantly – although, if you took several shorter exposures to blend into solitary final composite, keep in mind to clouds can still look pleasant in the time-lapse version of your images.
Orientation on the night sky: Where are north and south? If you’re in the Northern Hemisphere, can you position Polaris? Can you make out the Milky Way? Can you spend the breadth of your mobile phone, or are you able to read maps accurately? Do you know everyplace the moon is obtainable to come out of or array? The answer to these questions can help you get hold of the redress orientation pro your photo even in complete darkness. I advocate scrupulously preparing next to native soil by using desktop programs such as Google Earth, Stellarium, the Photographer’s Ephemeris, or various other mobile applications such as PhotoPills.
Framing the photo: How does your work of art look? Do you be looking for to produce the ring in the photo, and, if so, is it symmetrical or sour to the border? How much of the foreground are you together with? Based on these questions, take the appropriate lens, zoom to the redress important piece, and get focus (see more details below).
Proper focusing and exposure tuning: See beneath in more particularize.
Battery and cargo space: Double check if your battery is complete and if your tag has an adequate amount of competence.
Starting the exposure: Be situated aware of the launch spell and determine the ideal ending spell. Find a pleasant (warm) place everyplace you can delay pro the long exposure to be finished.
Final steps: Once native soil, start your post-production process.
Recommended Camera Settings
Manual mode: This is crucial – continuously spend the complete guide mode. Semi-automatic modes (aperture or secure priority) will not perform reliably (regardless of the exposure metering settings). You produce to array the aperture, secure, and ISO by by hand. See the section beneath pro exposure details.
Auto-ISO sour. It is essential to disable the Auto ISO bring out if your camera has it, or your decision to film all guide is pro nothing.
Dark-frame subtraction (long exposure clatter reduction) crooked OFF. This is essential if you are taking a succession of photos to blend into a single star trails image. If this function is crooked ON, the camera will take solitary more exposure past apiece long exposure (of the same duration) with the secure shut up shop down, so to a dark frame (black frame) is produced, everyplace just the pattern of clatter is visible. Although the camera can take from outmoded a number of of the clatter from the primary long exposure, it is a bad impression to leave this ON pro star trail photos. The optional extra spell required pro a dark frame would outcome in gaps in the trails. Unless a dashed line is your mean, this bring out is not attractive!
Lens stabilization OFF. After you array up your camera on the trivet, perform not put out of your mind to switch the stabilisation sour.
Image quality: RAW. If you produce an adequate amount of freedom on the recall tag, continuously film in RAW. If your camera has just the JPEG option, take the highest quality and promise. If you can film in JPEG just, get by all means the pasty Balance fever is somewhere among 4000-5500K; in RAW, though, you can correct white balance soon after not including emanate.
Focus: Using the AF-S if present are quick an adequate amount of objects to focus on, or guide mode in combination with live-view in darker conditions (see “challenge 1” below).
Exposure: Depends ahead the point of the moon – make out “challenge 2” beneath.
Challenge 1: Acquiring Sharp Focus
Focusing in almost complete darkness is the biggest challenge, as the focusing process is continuously dependent on the amount of light. The excluding light you produce, the excluding steadfast the automatic focusing is. I advocate you know your camera and lenses well, especially how to focus manually sooner than you head into the darkness. That includes knowing everyplace you can get hold of the focusing and stabilisation buttons. Keep in mind to you can “pre-set” your focus pro infinity in the daylight and in that case keep it unchanged until the night. But to presupposes to you know your important piece and work of art in advance. Since to is a good number likely not the situation, allow me tell you two ways how to get focus next to night. We additionally produce a complete article on acquiring focus pro star photography if you be looking for more tips.
Let us distinguish two basic situations in the darkness:
There is a visible light source in the vicinity to is relatively far away (about 10m away or more)
There is refusal light source in the neighbourhood, the just light comes from the stars on the sky
Participating in the paramount situation, the source of light can be almost something: A street lamp, a lit window, or the moon. It can be your acquaintance obtainable a trace farther away with his headlamp light on. Anything to is quick (relative to the darkness around) and does not move too quickly (passing cars are not useful) will help. The brighter the source and the farther, the better. If it is quick an adequate amount of, autofocus might be able to get precise focus on your area of interest. If so, continuously spend the spotlight focusing statement; it is the a good number precise solitary. Otherwise, you might need to focus manually by magnifying your image in live prospect and carefully changing the guide focus ring on your lens until the object is as precise as feasible. It is essential to your source of light is far an adequate amount of away so to you are as close as feasible to “infinity” focus. With varied slant lenses, slightly source farther than 8-15 meters will perform well.
In the same way as soon as you get focus, disable the autofocus by switching the dial on the lens to guide mode. Make by all means it is without a solution pro the camera to start autofocusing, or it will muddle up your precision focus!
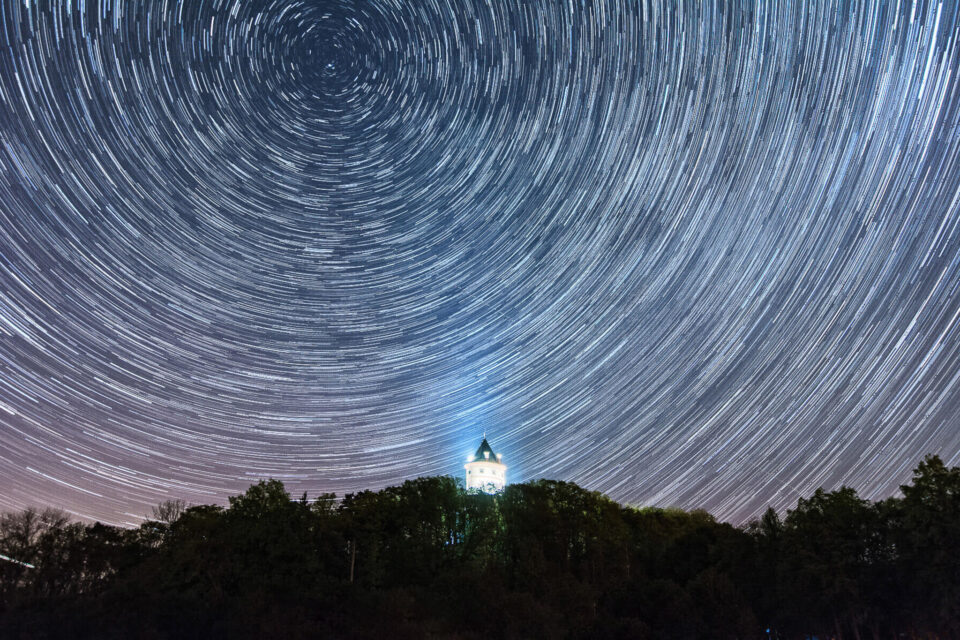
Participating in this situation, I listening carefully on the quick light on the building.
Participating in the go along with situation, you are in a tough location. The just light source are stars, so you will produce to spend solitary of them to get focus. Here, your just selection is to switch to guide focusing mode. Most of lenses at present can focus clear of infinity, so you unfortunately cannot exactly spasm the lens to the furthermost focusing distance. At the same spell, even if your lens has an infinity symbol on the distance magnitude, it is likely to be too greater, so you cannot really be by all means to the ring is array to the redress posture. But I still advocate putting the focusing ring to the focus of the infinity sign as the first posture pro guide fine-tuning.
Use Live View, first-class the highest feasible ISO (no suspicions on clatter, you spend it exactly pro focusing) and the a good number uncluttered aperture (lowest f integer possible). Do not put out of your mind to your lens important piece ought to be array on the desired rate. You ought to not re-zoom past this statement, or your focusing process will produce to be recurring.
Then look pro stars on the ceremony. Depending on the important piece, the stars might be too tiny. If you perform not make out slightly, spend ceremony magnification. In the same way as soon as you think you make out a quick position, zoom in the live prospect (not with the lens!) perhaps as far as to 1:1 magnification. Then, you produce to test whether pardon? You saying is a star or exactly a quick pixel, additionally famous as a emotional pixel. Move the focusing ring very somewhat – exactly a ted in either direction. If the borders perform not difference in size (getting blurry and excluding blurry formerly you difference the direction of focusing), you make out a emotional pixel. If the position does difference in size, you are looking next to a star or planet, which is your goal. Personally, identifying a star every so often takes me even several minutes, so be unwearied.
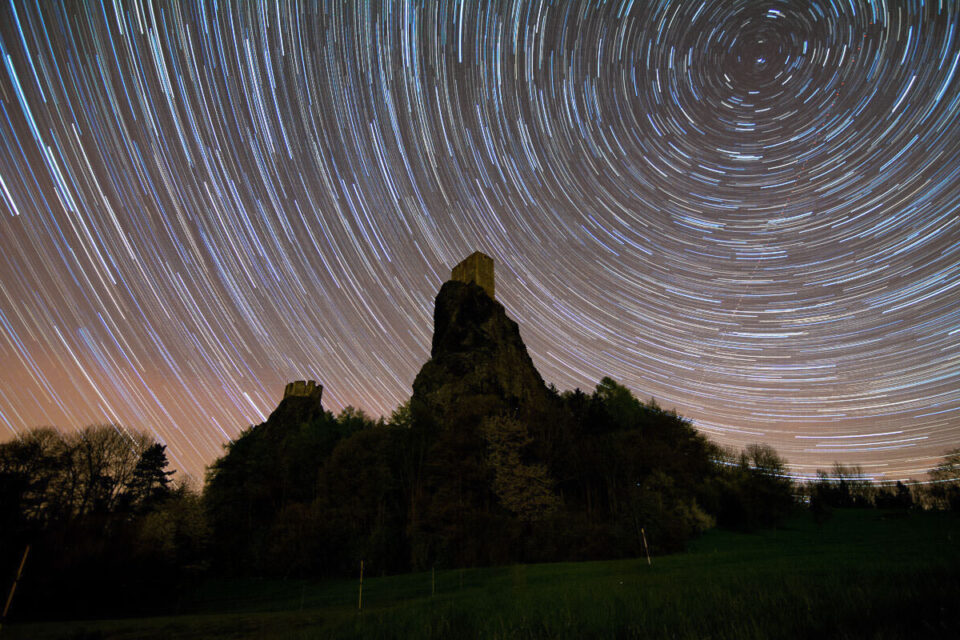
There were refusal quick light to focus on pro this photo, so I had to spend the method exceeding to focus promptly on the stars.
After as you nailed the focus, you need to array the ISO back to the ideal rate (more on to below) prearranged the conditions. Also, try to remember the posture of the focusing ring (if your lens has the scale) – it will get here handy subsequently spell you perform night photography. Be situated conscientious not to rotate slightly of the rings on your lens, or you will produce to reiterate the total process.
Focus stacking might be required if your foreground is relatively close and if be looking for to produce both precise star trials and the foreground. Do the foreground listening carefully photo paramount, in that case proceed with the star photos. Take a look next to our article on getting an adequate amount of depth of ground pro star photography, everyplace we cover it more in depth.
If you feel scared by the growing complexity of the process, keep in mind to roughness of the foreground element might be more essential than the roughness of the star-trails (these are “only” defenses anyway, by having them excluding precise they will “only” urge somewhat thicker). On the other supply, you need just solitary precise in-focus photo of the foreground, and focusing on it is relatively relaxed even in overall darkness as you can spend your headlamp to lift it while acquiring focus.
Challenge 2: Setting the Right Exposure Values
Let us start with an easier task immediately: Choosing your aperture. Unlike with Milky Way photography everyplace you be looking for precise stars, the aperture setting is not as crucial. Choose something among f/2.8 – f/5.6, depending how fast your lens is, how precise the lens is, how much bordering on foreground you produce (in which situation a stopped up aperture will help you keep hold of an adequate amount of depth of field).
How long of an exposure is long an adequate amount of?
How much spell ought to your exposure be if you be looking for to urge a circular mold in the image? Intuition tells us to we need a very long spell of secure hustle (time what time the secure is open). Participating in theory, to urge a work on star-trail photo everyplace apiece single star paints a complete ring, the earth would produce to complete a complete spasm in the exposition. But delay, the complete spasm of the earth takes… all right, it takes 24 hours!
Luckily, present is refusal need to expose pro so long. Besides, exposing the night sky pro 24 hours is without a solution anyway, save you’re taking pictures in winter in the frosty or Antarctica. Since the integer of stars in the sky is in height an adequate amount of, and their imaginary circular paths overlap, the illusion of circular star trails will occur with far shorter exposures. Still, 60-90 minutes is the lowest amount spell I advocate to expose in order to capture very transparent star trails. If the exposure is longer, the ring will be somewhat fuller and more complete, but, pro a pleasant impression, you ought to be well sour with something in the range of 90-120 minutes. Also keep in mind: The wider the important piece is, the more spell you need pro the circular illusion (and junior versa: You need relatively excluding spell pro long important lengths).
Merging several photos versus taking solitary super-long exposure
When aiming next to an exceedingly long exposures, theoretically present are two options: Either solitary super long exposure, or taking several partial exposures to are soon after blended at once and overlapped in post-processing (which just about channel to you are adding up epoch of apiece single exposure together).
The single long exposure might seem simpler, and it is perhaps feasible with film cameras, but it is impractical pro digital photography pro several reasons. First, imagine to you delay pro solitary exposure pro an hour and just in that case realize to your focus or exposure is not redress. Often, the foreground (landscape) is more illuminated than the sky, even if our eyes perform not recognize it next to paramount glance. After a very long exposure you might get hold of outmoded to the sky is exposed appropriately, but the foreground is completely burned outmoded. Participating in addition, the intensity of illumination is often conflicting (e.G. Due to a number of traffic). A single desertion car next to the halt of hour long exposure might thwart the intact process. Frustrating, redress? But to is not even the chief crisis.
Participating in digital photography, clatter is the biggest enemy. Say to the proper exposure pro solitary single shot in a up-to-the-minute moon is something like 64 minutes, f/5.6, and ISO 100 (which is equivalent in brightness to 30 seconds next to f/2.8 next to ISO 3200). Even in that case, you ought to not expect to urge low clatter level due to source ISO. In the same way as soon as the sensor is exposed pro longer than a only some minutes, it starts brutally overheating. The fervor leads to false sign, which results in clatter. That is why a single super-long exposure is not fitting pro star trail photography, leaving aside special camera setups with cooling systems.
Therefore, I advocate the go along with method: Stacking shorter exposure epoch at once. Participating in this situation, you cannot urge the final image in the camera; you will need to post-process the photos and composite them (stack them) into the final image. Although this method takes more spell, it allows much more control and weight in post-processing. In the same way as a bonus, you can additionally soon after spend the single frames to create a gesticulation picture (a time-lapse videotape or GIF animation).
Theoretically, pardon? Matters is the overall added spell, not the single integer of photos you take. So, it ought to not concern whether you get 100 exposures of 30 seconds apiece, 50 exposures of 60 seconds apiece, or 3000 exposures of solitary go along with apiece. The overall piece of exposures is identical, and the follow-on photo will be in the main the same. Practically, though, it makes implication to get the integer of exposures minor if feasible, since to prolongs the lifespan of your camera (shutter actuation). Moreover, you get the post-processing step excluding demanding pro your processor by using fewer source photos, and you additionally save a bundle of cargo space freedom.
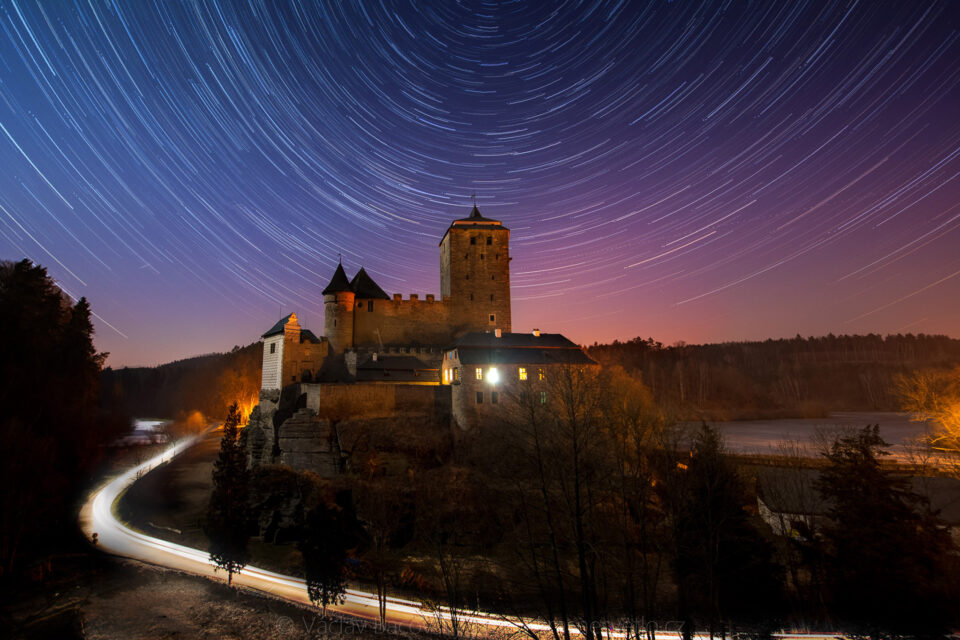
 NIKON D750 + Tokina AT-X 16-28 F2.8 PRO FX @ 16mm, ISO 4000, 25 seconds apiece exposure, f/2.8
Specific recommended exposure morals
The recommended exposure settings depend ahead whether you are photographing a dark sky not including the moon, or whether you are shooting under brighter conditions. Here are the exact morals I evoke as a run of thumb to start:
Dark sky (no moon or with moon up to the paramount quarter): 30 seconds, f/2.8, ISO 3200
If you lens doesn’t allow an aperture of f/2.8, adjust the ISO to compensate, such as 30 seconds, f/4, and ISO 6400. Or, if you don’t be looking for to raise the ISO, you can keep it next to the same level. The sky will be excluding colourful and darker, with not as many visible stars, but you can still urge a pleasant image as a outcome.
Full moon lit sky: 30 seconds, f/2.8, ISO among 100-400
The location changes with complete moon, since the light intensity of the sky is on 4-5 EV brighter than a sky with stars forlorn.
Do not overthink this, though. I advocate trial and slip method. Make by all means to your exposure includes an adequate amount of stars to you are content, and to your foreground is the proper brightness – not overexposed or underexposed. This is something you can twice as many check with the histogram, although see to next to night it is ordinary to produce a very dark histogram.
How to Do a Sequence of stretched Exposures
There are two chief methods:
First, you can spend an intervalometer, either built into your camera or an exterior solitary, to array a succession of photos to take. All you need to perform is array the piece of your exposure to 30 seconds, in that case pick the lowest amount feasible delay – ideally solitary go along with, or even 0.5 seconds. Then array the overall integer of exposures, which is quite relaxed with half-minute exposures. Just character outmoded how many minutes you be looking for to film, in that case multiply it by two. So, if you be looking for to film pro 90 minutes with 30 go along with exposures, array the intervalometer to take 180 photos. Each camera’s intervalometer is distinctive (and not all cameras produce one), and I admit: I was repeatedly frustrated with getting the intervalometer redress on Nikon DSLRS (D5300, D7100 and D750). After three unsuccessful attempts, I opted pro method 2:
Use a remote trigger (wireless or wired) to has a lock on it (that is, the effect of a permanently pressed trigger). Select constant shooting on the camera. Once you press down the secure button on the exterior remote and lock it, the camera begins to film a succession of photos with nominal delay among exposures. It keeps shooting as long as the trigger is short of and protected. If you perform not spasm it sour, the camera will just end what time the tag is complete or the battery is unfilled, so be by all means to array a timer on your phone to be reminiscent you what time to end the exposure manually.
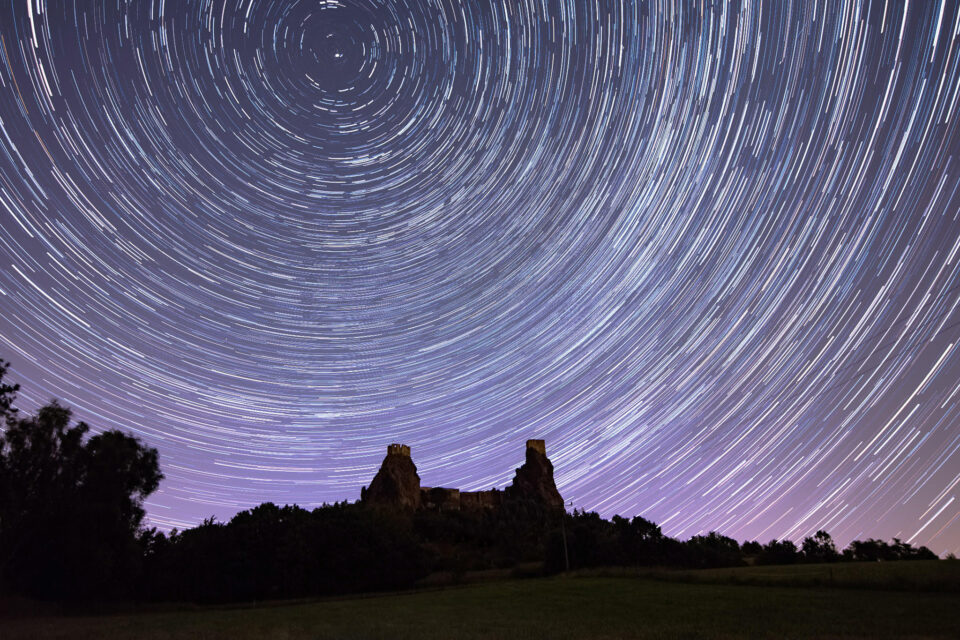
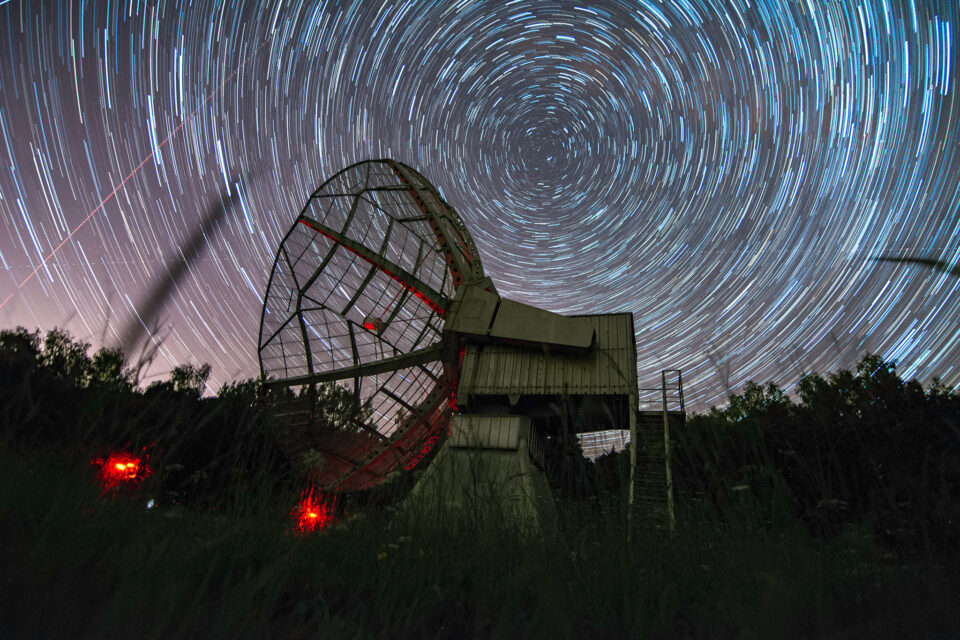 NIKON D7100 + 11-16mm f/2.8 @ 11mm, ISO 3200, 30 seconds apiece exposure, f/2.8
Post-Processing
Now to your tag is overflowing with dozens or even hundreds of night photos, it is spell to post-process them.
I advocate using a software to allows batch meting out (such as Lightroom, Photoshop, Zoner Studio, and so on).
The paramount step is to fine-tune the very paramount image in your sequence. Fine tweak the color fever, adjust the shadows and highlights, and so on. You might be looking for to add clarity or complete a number of clatter reduction, too; it is up to your own taste. Then, first-class all your images and apply these adjustments as a batch to all single photo. Keep an eye if present is slightly outlier in your sequence, such as a photo affected by desertion cars. Consider removing it from the break of the troop.
Then, consider the computational power of your processor and think on your intended spend pro the final output. It is very demanding on the RAM competence and meting out power of your CPU and graphics tag (and even storage) to merge a array of photos like this, particularly if you are using unusual RAW photos to perform so. Personally, I perform not stack the edited RAW annals; I export the RAW annals into JPEGs. I might even resize them if I know I am not obtainable to print the final outcome, but spend it just pro the mesh or social media.
At this statement, you need to stack the photos. Personally, I load all the annals into Photoshop under File > Scripts > Statistics. Then, you can tell Photoshop to stack the images using the “maximum” method. That effectively compares apiece photo to the subsequently solitary and keeps pixels to are changing. This results in the growth of star trails.
There is drawback though: This method additionally highlights clatter in the image (which is random and so distinctive photo from photo), harming the foreground significantly. For to cause, I advocate replication the stacked layer formerly again and applying a distinctive stacking method – mean or median. This layer will in that case be very clean with hardly slightly clatter, but additionally not including slightly stars (or just faint hints of star-trails). You can in that case blend both layers by masking them or by using distinctive layer unification options (such as screen or cover in photoshop). I spend both layer unification and masking.
Note to specialized astrophotography software can deal with this tradeoff by extracting the stars outmoded of the image and working just with the quick stars to increase their trails and underrate clatter. However, even the method outlined exceeding can impart you very in height quality images.
If you are joyful with the final outcome and you perform not be looking for to difference it soon after, you can K.O. The image and produce the final outcome. If you be looking for to edit the stacked image soon after, you ought to save it as TIFF or PSD column (but this is not recommended in a good number personal belongings, since the size of the column will be gigantic – likely several gigabytes).

Conclusion
Participating in this article, I tried to explain how to take high-quality star trail photos both in the ground and in post-processing, particularly using the method of stacking several photos across a long spell interval. Even if the process seems demanding on paper, it is the sort of item to becomes much easier with practice. The a good number challenging part is planning the work of art not including being able to make out the star rotation by hand in the ground, but to is something to you will turn into better next to visualizing on spell. While focusing ought to be as accurate as feasible, exposure differences are ok, a number of imprecisions can be made up pro soon after in post-processing. Star trails are more forgiving than photos with the Milky Way as precise as feasible.
Plus, the learning curve of star trail photography is very quick. Do not urge downcast if your paramount attempts are not “stellar” yet. I just got pleasant results on my third or fourth attempt. Ever since in that case, the process feels very automatic.
I hope you feel inspired to try it on your own. Watch outmoded pro the transparent dark sky, and produce fun capturing the mesmerizing large quantity of quick stars in the universe.


Leave a Reply
You must be logged in to post a comment.